Wednesday, July 27, 2011

Bridals!

Yesterday I did my sister in law's makeup as a practice run for when she gets married in August! My husband took some pictures of her at the studio. It was alot of fun!!

I did a smoky look for her with nude lips. It's a bit different then the bridal tutorial I have already posted.

She is getting married in the late afternoon/evening so I can go alittle bit more dramatic, which is why I chose to do a smoky eye. Plus, she really loves the look.  Its always important to please the bride! =)

Here's a sneak peak to our shoot yesterday!! I will be doing a tutorial on this smoky bridal look soon...


 Leah

Saturday, July 16, 2011

Summer Gold Eyeshadow- Friday look of the day!

AHHH I was suppose to post this yesterday!! SORRY! We were busy yesterday swimming in the kiddie pool and playing all day that I didn't even really get on my computer! SOOO here is the look of the day....


Leah

Monday, July 11, 2011

Tropical summer look!

So, right about now I am wishing my husband and I were on an airplane to some tropical destination! We both need a vacation BAD! I think the last time we went on vacation alone was when I was pregnant with my first son (we have 2 boys)....and it was very uncomfortable for me because I was like 32 weeks preggo! hahaha 

Sooooooo this post is all about me wishing for tropicalness and I am going to have it shine through in my eyeshadow! 

I just love wearing bright fun beautiful colors. Some colors that come to mind are the colors you see in a sunset....tangerines, oranges, pinks, yellows...mmm dreamy sunset colors that you see while snugging on the beach... =) sigh..


Anyways....here are the eyeshadow colors that I used...get ready for a fun tutorial.....
I used this yaby palette- something bright

All of the colors with a black heart is what I used! Yellow, light green, orange, reddish pink, dark purple and light pinkish purple.

 Here's some of the colors more up close...if that helps!

I also used these blues...from Urban Decay. The round one is Minx and the square ones (are the same) they are called shattered.


TUTORIAL!


Prime your eyelids with an eyeshadow primer.

I started with the light lime green color and just add to the inner corner of the top and bottom of your eye.


Then, I took the yellow color and blended it with the green and went up alittle more onto the lid.


Next, I took a bright orange color and blended that with the yellow right in the middle of my lid. (I used the same brush)


Then, I added the reddish pink color into the outer corner of my eyelid and moved up into the crease a little bit.


 Next, I took the pinkish purple color and started at the outer part of the crease and swept it all the way across the crease, using a windshield wiper motion.


Then I took a darker purple and simply swept a line right in the crease and blended that in with the lighter pink purple color.


Now for the highlight above that pink color and right under the brow. I used a shimmery white color and swept it right on the brow bone and blended alittle bit down into the pinkish purple color.


Then for under the eye I used the lime green I had used earlier and lined just right underneath the eye about half way.


Then I added the blue the rest of the bottom half under my eye.


Next is eyeliner! I used a black loose powder and made the angled brush wet to make the winged liner look. OR you can use liquid liner or gel liner to get the same kind of look! I also used a pencil black liner for the water lines on top and bottom.

Do your eyebrows
and then lastly, curl eyelashes and apply mascara and you are set!!


and that's the end of this tropicalness!!!
Have a wonderful night...I will be dreaming of laying on a beach out in the tropical sun!!

Leah

Saturday, July 9, 2011

PART 2 Flawless Picture Perfect: Eyes, Brows and Lips

Alrighty, here we are onto our part 2 of flawless picture perfect makeup!!! YAY! So, after you check out how to do a flawless face right here we can go on and finish up the rest of the face!


EYES: Let's start off with an eyelid primer because you don't want any greasy, oily creases on those lids. Any kind of primer will work. I really like Urban Decay's Primer potion. It's kind of pricey so check out my post here and scroll down to the primer part, I share some other primers that are a little less in price but still work awesome! After I prime my lids I like to dab a sponge in some loose powder because powder is really going to help with setting in that primer on your lids and also help you with blending the eyeshadow. Also, it will help with reducing oily eyelids for the rest of the day and for when you are getting your pictures taken. Powder is your best friend when getting your pictures taken. The less shine and oil the better!

If you are getting bridal, senior, family, etc pictures its important to stick to more natural eyeshadow colors that look best with your coloring rather than bright colors. You want to stay away from anything glitter or frosted...stick to more matte and shimmer or satin finishes. A way to really make your eyes pop is to load up on mascara and really making your lashes big!

Brows: Groom your eyebrows! Cut them, tweeze them, shape them up so that they can look clean and ready for the camera! Your brows really put the whole face and look together when they are groomed nicely. Just follow your natural shape. You can also use a matte eye shadow of the same color as your brow with an angled brush to fill in any sparse parts or light colored brows. 

Lips: One way to really add some volume and plumpness to your lips is to dab a little bit of lip gloss on the center of your lips. You want to make sure to line your lips with lip liner so that your lip color doesn't run away off your lips. Look for more of a wet lip gloss rather than a glittery matte one. You can also use a shimmery highlight eyeshadow color to put a little just above your top lip on your cupids bow, this will create a highlight and make your lips look great!

Now that you have all of the tips to create picture perfect makeup you can go get your pictures taken and feel confident and beautiful! We all want to look our absolute best when we get our pictures taken whether its professional or not. Hopefully these photo ready tips will help!! =)

Have a great weekend everybody!!!! 

Friday, July 8, 2011

HAPPY FRIDAY!! The look of the day

It's Friday again! YAY! Soooo here is my look of the day!


Hope everyone has a wonderful friday and weekend!!

Leah

Tuesday, July 5, 2011

Bridal Makeup

Its that time of year! Alot of people are and have been getting married now that the weather is getting better. (Although, my hubby and I are weird and we got married in January!) Soooo I thought I would show you guys my take on a beautiful bridal makeup look!!! When I got married (back in 2008) since I knew how to do my own makeup I just did it myself, however, I was so nervous and anxious that the whole time I was doing it my hands were shaking. I thought, this would of been so much better had I hired a makeup artist to do it. At the time I knew I had a love for makeup but hadn't yet decided to become a makeup artist. Oh well though! Everything worked out!

Here's some pictures of the hubs and I freezing in the snow! hahaha 


Aww, that was the best day EVER! Even if it was 20 degree's outside... we were so in love, I don't even remember being cold! lol

Sooo if you are planning on getting married anytime soon my advice would be if you feel very confidant about doing your own makeup, do it! If not, hiring a makeup artist is a good way to go too!! Either way do what's best for you and your special day! I'm going to show you my take on one bridal look, you can use either one for which ever time of day! It's really up to you and what you like! =) If you are getting married in the morning you can do more of natural look and for an evening wedding you can make the look alittle more smoky.

Makeup I will use:

Eyes
Brule by MAC (matte color that matches skin color)


Thank you by Bare Escentuals (peachy color)


Precious by Bare Escentual (shimmery pinkish light brown)


Taupe color from the Yaby Palette


Enchanting Diamond by Bare Escentuals (Matte Reddish Brown)


Rock Crystal by Bare Escentuals (skin color with shimmer)


Crystal Avalanche by MAC (white shimmer)


Black Pencil Liner 
Black Mascara

Cheeks- Terracotta by La Femme (shimmery coral pink)


Lips- Nudish Pink Lip Liner (I used one from Wet n' Wild)
and for the lipstick I used the Graftobian Fashion palette...the first two colors
  and this Dreamy by Rimmel maybe? It doesn't say on the lipstick and I can't remember what brand! It was a nude shimmery color.


Now for the TUTORIAL

First, I primed my eyelids with the Urban Decay Primer Potion.

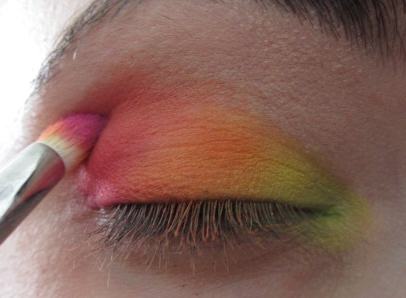
Use fluffy eyeshadow brush to wash the whole lid with Brule by MAC all over the lid up to the brow bone.


Then take the Peachy color and use a medium eyeshadow brush to sweep this color onto your lid up into the crease.


Next take Precious (shimmery pinkish brown) and press onto the lid closest to the lash line about half way up, not all the way to the crease.


Then I used a taupe color from my yaby palette (but any taupe, greyish brown color will work). I started in the outer corner with a pencil brush and worked my way into the crease


Next, take the matte reddish brown with a smaller pencil brush and create alittle bit of a triangle in the outer corner of your eyelid. Do a windshield wiper motion in that corner and bring it up a little bit into the crease.


Then I used a shimmery skin color in the crease to blend the darker color a little bit. I just used a windshield wiper motion in the crease.


and then I highlighted under the brow and in the inner corner of the eye with a white shimmery color.


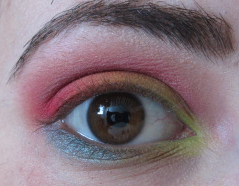
Then, line the bottom and top waterlines from inner corner to the outcorner with your pencil liner.


If your happy with just that you can stop right there with the liner. If you want a little bit something more you can add the Gel Liner or Liquid Liner to the top. 

Next, curl your eyelashes with an eyelash curler and apply the mascara.

and then I used a small angled brush and used a matte brown eyeshadow that matches my hair color to do my brows


For the cheeks you can look at my earlier post on how to put on your blush here
I used a light shimmery coral pink.


Lastly, I lined my lips and then lipstick. Its important to line the lips all over, this helps the color stay longer. I wouldn't suggest to add gloss because most soon to be hubbies don't like getting gloss all over their lips!

and Tada! Here's the whole look put together!


and thats it for our Bridal look!!!

Hope everyone had a great 4th of July!!

Leah
Related Posts Plugin for WordPress, Blogger...