Showing posts with label Flawless Makeup. Show all posts

Saturday, July 9, 2011

PART 2 Flawless Picture Perfect: Eyes, Brows and Lips

Alrighty, here we are onto our part 2 of flawless picture perfect makeup!!! YAY! So, after you check out how to do a flawless face right here we can go on and finish up the rest of the face!


EYES: Let's start off with an eyelid primer because you don't want any greasy, oily creases on those lids. Any kind of primer will work. I really like Urban Decay's Primer potion. It's kind of pricey so check out my post here and scroll down to the primer part, I share some other primers that are a little less in price but still work awesome! After I prime my lids I like to dab a sponge in some loose powder because powder is really going to help with setting in that primer on your lids and also help you with blending the eyeshadow. Also, it will help with reducing oily eyelids for the rest of the day and for when you are getting your pictures taken. Powder is your best friend when getting your pictures taken. The less shine and oil the better!

If you are getting bridal, senior, family, etc pictures its important to stick to more natural eyeshadow colors that look best with your coloring rather than bright colors. You want to stay away from anything glitter or frosted...stick to more matte and shimmer or satin finishes. A way to really make your eyes pop is to load up on mascara and really making your lashes big!

Brows: Groom your eyebrows! Cut them, tweeze them, shape them up so that they can look clean and ready for the camera! Your brows really put the whole face and look together when they are groomed nicely. Just follow your natural shape. You can also use a matte eye shadow of the same color as your brow with an angled brush to fill in any sparse parts or light colored brows. 

Lips: One way to really add some volume and plumpness to your lips is to dab a little bit of lip gloss on the center of your lips. You want to make sure to line your lips with lip liner so that your lip color doesn't run away off your lips. Look for more of a wet lip gloss rather than a glittery matte one. You can also use a shimmery highlight eyeshadow color to put a little just above your top lip on your cupids bow, this will create a highlight and make your lips look great!

Now that you have all of the tips to create picture perfect makeup you can go get your pictures taken and feel confident and beautiful! We all want to look our absolute best when we get our pictures taken whether its professional or not. Hopefully these photo ready tips will help!! =)

Have a great weekend everybody!!!! 

Saturday, June 25, 2011

PART 1 Flawless Picture Perfect: Face

If your getting your picture taken, whether for your wedding day or for a family photo shoot, this post is just for you!

I'm going to teach you how to create that picture perfect flawless face you want!

For your face, the lighting in the studio or if it is natural light is going to pick up every little thing on your face (of course alot of photographers are going to use photoshop as well, but I wouldn't rely on that) so you want to use a full coverage foundation and/or one with a matte finish so that you don't have any shiny spots, and use concealer and finish it with powder. If you are taking pictures in a studio you can wear more make up than you would for an outside shoot. You want to make sure to warm up your skin with warmer cheek colors rather than cool, because this will make the skin look more fresh. So even if you don't normally wear blush you want to at least wear a little color so that you can have some life in that beautiful face! Be sure to highlight and contour the appropriate areas so that you can add more dimension to your face (we will focus more on that in alittle bit).  
  1. PRIME: Start by putting moisturizer on your face, start the base out smooth and soft. Go here to see what cleansers and moisturizers I use. Then you can use a foundation primer. I really like the Smashbox photo finish foundation primer. 


2. CONCEAL: use concealer to cover up any spots or dark circles or anything you want covered. You want to use a concealer closest to your skin color to cover any blemishes or any redness around your nose, mouth and eyelids. If the blemishes are really red you can use the green as well. If you have any blue or purple showing through anywhere on your face you can use the orange or yellow color to cancel those out. Then use the lighter highlighter color to go under your eyes, under your brow bone and down your nose and chin. 

you can get the Graftobian corrector palette $23 here
or Victoria's Secret Camouflage concealer palette $14 here


or if don't want all those colors of concealers...

use the darker color to cover up any redness and the light color to highlight under the brow bone, down your nose, under your eyes and a little on your chin. 

or
Revlons Photo Ready Concealer for about $8 at local drugstore

3. FOUNDATION: Then apply foundation all over face. Some really good brands for full coverage/matte finishes are... 
cover FX cream foundation $42


Revlon Colorstay about $12-$13 at your local drugstore.


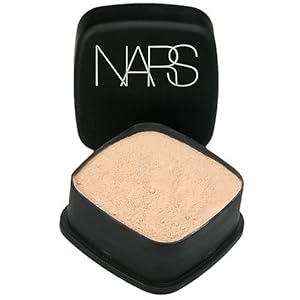
4. SET: After the concealer and foundation you want to finish and lock everything in with powder. If you tend to have more oily skin this is a must! Powder on area's like your forehead, nose, and chin (your T-zone).

NARS Loose Powder $35
This seems pricey but this comes with a lot of product and will last you for ever

or


5. CONTOUR: You want to use a matte brown/tan color, any kind of matte brownish blush/bronzer will work (usually one or two shades darker than your skin color)  to contour and make your face look more sculpted. You don't want this to be too much of a dramatic difference so blend really well.  You want to apply this on the sides of your cheeks along your hairline and up to your temples. Your goal is to make your face appear more oval shaped.


Sienna by La Femme Blush about $3-4


Soft Beige by La Femme Blush


Blunt Blush by MAC $19.50


6. BLUSH: You want to use a matte finish blush. Stay away from shine when getting your pictures taken.

7. HIGHLIGHT: We already did a little bit of highlighting with the lighter color concealer. But to add a more fresh look to your cheekbones you want to add these two products..


MAC's cream color base in Pearl or Shell $16.50

Add this first, this will make the cheekbones look dewy. You could also add just a little bit onto your cupids bow, right above your lips.

Then add a shimmery powder to set it.


MAC Mineralize Skinfinish in Soft and Gentle $28


or


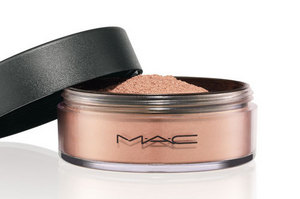
Iridescent Loose powder in either Silver Dusk or Golden Bronze  $23

If you don't want to spend that much $$, really anything that is light and shimmery will work! You don't always have to spend alot of money to get the right highlighting look.

And that's the end of our flawless face journey!!!
I hope this will help with achieving an even and fresh looking picture perfect face!!
yay!!!
Hope everyone has a wonderful weekend!!

Leah

Next Flawless Picture Perfect Post: Eyes, Lips and Brows
Coming soon! click here for part 2!
Related Posts Plugin for WordPress, Blogger...